Collada plugin for
After Effects
More info here
After Effects
More info here
PDF documentation for the Unofficial Update v8 version of trueSpace. Authored with Scribus. Includes a new video file from the beta testing days that demos the copy skin weights button. The manual also includes some corrections and missing information for the original manual.
There is no installer for this manual. The trueSpace manual and Unofficial update must be installed first. Copy the files as indicated in the included text file.
source scribus files and images used to create the pdf manual. Authored with Scribus v 1.5.7, v 1.5.8 does not preserve the layout properly. tS_UU_Manual_Source
WIP uu v9 preview pdf manual can be found here: https://united3dartists.com/ in the Software section
Script no longer needed. Kept in place here for historical reasons and the fact that much time was used in it's creation. Maybe the techniques used will be useful elsewhere.
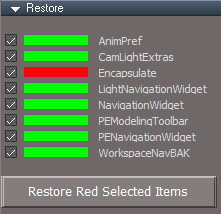
The Unofficial Updates has a flaw where it can easily uninstall toolbars and widgets that are not included with it.
Option #1: This replacement will change it so it only restores the intended objects. It also provides the option to not restore the objects. The script runs automatically on startup. If any of the objects are missing the panel will show with the missing objects in red.
Option #2: delete it, run Unlock UU9.RsObj to permanently delete the restore script.
When the panel shows, press the "Restore Red Selected Items" button to restore the items.
Uncheck the corresponding box and press the button to ignore the missing item.
To force the restore of an ignored item
Comes pre-installed in the Unofficial Updates
A Collection of functions to be reused anywhere. Includes functions for displaying message boxes with optional timeouts and opening frame panels.
drag into the link editor to install
The script requires the plugin, Clintons3dPlugin
minor adjustment to open panel code
Comes pre-installed in the Unofficial Updates v9
JSON - JavaScript Object Notation functions used to translate JSON text to and from Javascript objects
drag into the link editor and press the install button
script for opening floating panels arranged from right to left
drag into the link editor and press the install button
persistent base install required
Global Function Set is required
The script requires the plugin, Clintons3dPlugin
To show the default panel of the selected node
To show the default panel of a defined node
To show the default panel of a defined node at the mouse location
Aspects note:
Notes
Comes pre-installed in the Unofficial Updates
This script enables advanced control of the status line without generating undos and with optional timeouts for the message.
See techniques page for command details - techniques - status line
The script requires the plugin, Clintons3dPlugin, version v.1638429.
Collection of scripts that were removed from the widgets for update and consolidation.
drag into the link editor and press the install button
The script requires the plugin, Clintons3dPlugin, version v.1638429.
If UU9 is installed only the Widget Function Set and the ZoomToSelection will be installed
Basis for script installations that can be recovered from a context reset or a layout change.

Script and plugin combination for doing snap transformations inside trueSpace 7.61. It will move an object/element selection to the center location of another object/element selection.

Script and plugin combination for creating dimension objects inside trueSpace 7.61.

Changes to the unofficial updates to match my preferences and buttons for most of the widget shortcuts.
Pre-install several required scripts that are needed by other scripts. Not for the Unofficial Updates
Install many scripts in one go. Replaces old Mass installer script

Recreate some of the alignment and distribution functions of Inkscape to organize the locations and rotations of objects in a scene.

Align the 3D perspective view to the selected face or triangle.
After alignment the Screen coordinate system can be used to keep transformations within the plane of the selection.
requires Clintons3dplugin v1638443

This script will copy and paste mesh data from an external file. Supports UV and morph options. Does not support Weightmaps, SubD and Lightwave style UV's
"Easily copying and pasting of geometry and common attributes across 3D Applications, perfect for quick iterations between them, without concerns about file management."
This script will copy the UV values from one mesh to another. Useful for UV mapping in an external application like Blender.

Library place script for organizing projects and for incremental object and scene backups. A library place is a collection of trueSpace libraries.
Comes pre-installed in the Unofficial Updates

This script will copy the attributes from the source node to the destination node. It works by getting a list of input connectors on the source and if a connector with the same name exists on the destination node the value will be copied.
One use would be to convert a light to a different kind of light. Add the desired type of light to the scene and set it as the destination. Set the source light and when the script is run it's color and location will be copied to the new light.
Verify will ask before copying each connector value.
The script requires the plugin, Clintons3dPlugin, version v.1638404.

Web based color picker. Colors update in real time and it has 8 slots for color swatches. Web based scene view provides a tree based view into the scene. The layers system is an updated version of workspace layers 3 tools.
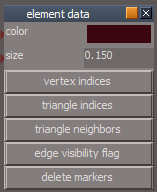
This script will display mesh information in the 3D view. It will show vertex, triangle and triangle neighbor indices and vertex indices. Information might be useful for scripters/developers. The triangle neighbors data display requires the plugin below.
Push delete markers to clear the display.
The script requires the plugin, Clintons3dPlugin, version v.1638403.
February 2015 - add matrial index display
April 6 2014 - add uv coord display for uv set 1
Comes pre-installed in the Unofficial Updates

Adds a visual indicator of the meshes origin for object navigation and point edit widgets and adds a center sphere for the point edit widgets.
To scale the object about the origin instead of it's center use Ctrl + LMB or Ctrl + RMB on the scale handles.
Ctrl + Left Click the sphere of the point edit widget and the origin will move to the center of the selection.
Widget based snapping requires that the Mesh Origin script is installed.
Comes pre-installed in the Unofficial Updates

Mirror tool that effects the object matrix values. Similar to the built in modeling mirror tool but mirrors the matrix values as well as the vertices. This tool is also compatible with cameras and lights.
persistent base install required![]()
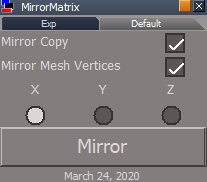
Select a scene item then choose an axis and press the Mirror button.
Mirror Copy - make a copy and mirror it
Mirror Mesh Vertices - a mesh requires that the vertices are updated for a full mirror effect. Can be disabled to only mirror the matrix values. This option is ignored for cameras and lights.
Script for transferring the matrix from one object to another. It moves the location, rotation and scale of one object to another. Original idea by MikomDude and icon supplied by Draise. United3DArtists thread here .
persistent base install required![]()
Select 2 or more objects and press the button. They will move, rotate and scale to the last selected object. Right click for options. The Use Local Space option can be used for grouped objects to move the members relative to each other.
Updated version comes pre-installed in the Unofficial trueSpace Updates as a Link Editor toolbar button.
CTRL add/subtract to selection does not work in the link editor.
This script simulates ctrl style picking for LE nodes.
persistent base install required![]()
January 13, 2018 - persistent install
April 6, 2017
Nov 2012: unique button id
Generates a guid that can be used as an id for buttons.
Feb 2024 includes code to copy the value to the windows clipboard
Place this object in a scene so that truespace 7.61 model side can render a workspace animation.
When truespace 7.61 was released a bug was introduced that prevented workspace animations from rendering in the modelside renders. The object animations did not transfer through the bridge. The bug also shows when scrubbing the workspace timeline and no motion will show in modelside.

A runnable list of all defined shortcuts including widget shortcuts in the Unofficial Updates.

Use to select toolbar nodes, save them to an internal store or a file library. Load from the store or library. Temporarily hide the toolbars to get them out of the way when switching to modelside. Easily save toolbars and transfer them to another layout.
Load this script and it will automatically change the colors of the axis lock buttons and the widgets to match standard color schemes for 3D applications (r,g,b) <=> (x,y,z).
persistent base install required![]()
Note: XYZ lock buttons color is not fixed for the Expanded and Workspace layouts, all other layouts are ok
work with latest Unofficial Updates cube widget
reestablished the widget color fixes and added cube widget
works with Unofficial Upate 4
November 2012: delete itself
Sep 18 2011 fixed XYZ button update.
The Point Clone script copies one or more objects to the vertex locations of a target object. The scale, rotation and location can all be randomized within a range specified by the user.
Distribute copies of an object on a circular arc or spiral. Alternate to the original radial array script below.
Distribute copies of an object on a circular arc or spiral. Older version. Obsolete?
Script to allow precision placement of physics center of gravity(COG) and constraint fixation points.

Scene View 2 description here.
Plugin and script that provides a window similar to the Scene view, but with more options and automatic alphabetization. It displays a list of all the items in the scene. If the Object Information script is installed it will update automatically from the rsx plugin.
Plugin and script that provides a window similar to the Scene view, but with more options and automatic alphabetization. It displays a list of all the items in the scene. If the Object Information script is installed it will update automatically from the rsx plugin.
Script for gathering statistics. Left click for mesh statistics. The objectStats gives vertex, edge, face and triangle counts. Object stats will continuously update via the web ui or the node list view
Python script used to convert a mesh to widget code format for use in the trueSpace 6 sdk code. Right click to download the script.
June 13, 2015
Script for alphabetizing the scene or a selected node in the Scene View. The script works by deleting and undoing the delete for each node in order.
Installs 2 buttons, one for rectangle style object selection and one for lasso style object selection.

rectangle style object selection via ray tracing or axis oriented bounding box frustum culling.
Link editor toolbar
Freeze transformations script. Set rotation to (0,0,0), set translation to (0,0,0) and set scale to (1,1,1) and set shear to (0,0,0) without changing the appearance of the object.
This script will alter spot and projector lights in workspace to give the appearance of a light defined by an IES file. It can also set general falloff so the hotspot angle will have an effect in the 3D viewport.
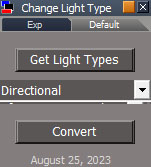
Convert selected lights to different types of lights. Maintains group and parenting relationships.

The Protect Workspace script saves and restores workspace attributes to protect them against modelspace changes. It protects materials, names, matrix transforms, camera fov and spot angle.
This script will create a button and toolbar. The button can refer to a script node or directly to script embedded in the button itself.
This script and scene file will create a 32bit tga image file, size 26x26 with an alpha channel for use with a toolbar button. It uses the D3D renderer to generate oversized color and alpha images. These images are combined and shrunk down to size to provide a 32bit antialiased tga file.
UU version deletes the intermediate files so not getting a button image for documentation purposes.
UU version found in the post process library


